Dial Calipers: Pros, Cons and Best Models
Vernier, digital or dial? That is one of the main questions that machinists face when it’s time to choose a new caliper. So, which style is the best?
In some of our previous posts, we discussed the benefits of both Vernier and digital calipers and provided our recommendations for the best models on the market. Our goal in this blog post is to share with you some insights on the pros and cons of using dial calipers, explain how to read them, and give you some recommendations on the best models.
Dial calipers explained
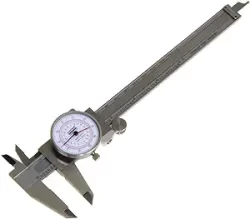
In extremely simple terms, dial calipers are like Vernier calipers with a dial. They use a rack and pinion mechanism to transfer the linear movement of the jaws of the caliper to the rotary motion of the dial indicator.
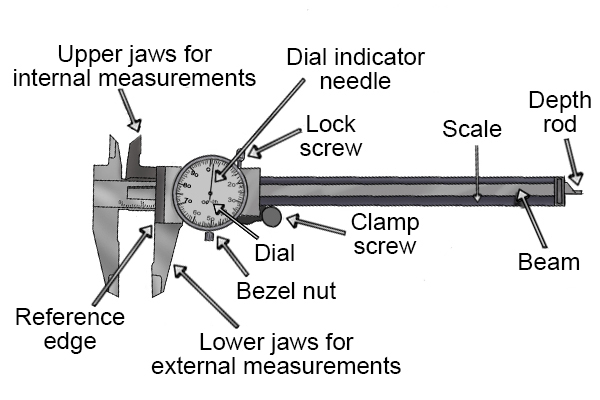
Image credit: bulbapp
The most common dial calipers have a measuring range from zero to six inches. These are the most useful because they can be easily handled, however 8-inch, 12-inch, and even longer calipers are available.
Pros & cons
One of the main advantages of measuring with a dial caliper is accuracy. Assuming the rack and pinion mechanism is free of debris, the accuracy can almost always be trusted. Though not as easily readable, when compared to their digital counterparts, the dial displays measurements very clearly and makes the tool much easier to read than a traditional Vernier caliper.
Unlike digital calipers, dial calipers can be used in wet conditions (but they are not waterproof so don’t use them to scratch your back in the shower). Also, since they rely on a rack and pinion mechanism, they do not require batteries which makes them more economically-friendly and potentially everlasting (if properly calibrated).
Dial calipers also come with some disadvantages. The rack and pinion mechanism tends to be pretty delicate and can easily become misaligned, leading to inaccurate measurements. If this happens, it can be difficult to recalibrate the caliper.
Last but nt least, having a dial limits the calipers to being either metric or inch reading.
How to read a dial caliper
Reading a dial caliper is fairly easy and somewhat similar to reading a Vernier caliper. All you have to do is follow these steps:
1. Close the jaws and check that the indicator points to “0” on the dial face.
2. If caliper doesn’t zero, loosen the bezel clamp screw and rotate the bezel to the “0” position.
3. Tighten the bezel clamp screw to fix the “0” position.
4. Close the jaws on the part without applying excessive pressure.
5. Read the measurement.
The main scale on the caliper with the inch system is marked every .100” and represents one revolution. Each graduation on the dial represents .001″.
Here’s an example:
Best models
Mitutoyo 505-742-56 D6″ TX-6 Dial Caliper
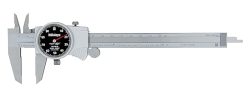
Mitutoyo 505-742-56 D6″TX-6 Dial Caliper
When it comes to dial calipers, you really can’t beat this 6-inch one from Mitutoyo. This caliper features a newly designed easy-to-read dial for ultra-smooth movement and high-shock protection. The dial face is black, instead of the typical white, which makes it easier to read. It can measure outside diameter, inside diameter, depth, and steps with precision accuracy.
Brown & Sharpe 599-579-5 Dial Caliper
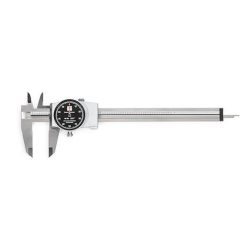
TESA Brown & Sharpe 599-579-5 Stainless Steel Dial Caliper
The Brown & Sharpe 599 dial caliper is available in three different sizes: 6-inches, 8-inches, and 12-inches. There are also two different color options: black and silver. This model also features a 1.25” diameter rotating dial and lock screw to hold the jaw in position and ensure consistency.
Starrett 1202F-6 Dial Caliper
Starrett 120 Series Fractional Dial Calipers for Accurate Measurement with Fitted Plastic Case
Well-built, precise and accurate, like any other Starrett tool. It is a little heavier than other calipers, but that also makes it sturdier and more reliable than other models. The quality, fit, and feel of this caliper make it easy to use.
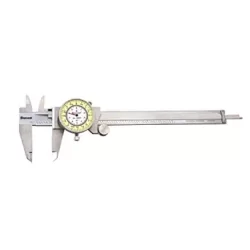
Anytime Tools Dial Caliper 6″
Anytime Tools Dial Caliper 6″
This caliper is an excellent option for light-duty home or shop use. This is one of the few dial calipers that has two needles and shows both inch and metric measurements on the dial, making it very versatile. Don’t let the price fool you, the quality and precision of this tool are impressive.
This post may contain affiliate links. Please read our disclosure for more info.


5 Comments
These dial calipers do both Imperial and Metric. The gearing for both needles is separate and they move independently. They are also highly accurate, and no dead batteries when you pick them up.
https://www.amazon.com/gp/product/B00B5XJW7I/ref=ppx_yo_dt_b_search_asin_title?ie=UTF8&psc=1
I was understanding the caliper is for rough (in terms of initial) measurement or to check progress where several thousandths are acceptable margins of accuracy? Is this true?
Yes True as a Starrett Micrometer.
I do not trust calipers for anything much tighter then about a 64th. (OK, Say +/- .005″) There is a reason that you will never see a Tool Maker without a complete set of his own personal micrometers.
We only use calipers in our shop for things like sorting drills or checking the OD of stock before cutting it off in a band saw. – They are OK for layout work too but not much better (If at all) then a good combination square and an Optivisor. You can get repeatable results with a caliper if you try hard enough but you will ALWAYS get repeatable results with a mic. (And I’m talking about dials, not digies)
That’s crazy. The cheapest caliper will repeat down to its lowest reading, far, far under .005″
Your shop needs rudimentary metrology instruction if you are unable to read a caliper lower than .005″
I am not a tool maker .I have Jap .0001 mics and digital cal and use each as accuracy requires. The fourth place is a bit iffy on both .